In today’s security conscious world, using encryption to secure workloads is becoming the norm, rather than the exception. To facilitate this requirement, VMware provides two distinct technologies to help customers simply and securely encrypt their workloads – virtual machine encryption and VMware vSAN data-at-rest encryption. In each case, a key provider is required to generate the encryption keys used to secure the keystores where the keys used to perform the data encryption are stored. (This 2 level encryption model makes for faster rekey operations as the data does not need to be decrypted if you only want to rotate the ‘wrapper’ keys)
When deciding to use of these encryption technologies in your design, you must first consider which type of Key Provider to use. VMware offers three supported options:
– Standard Key Provider
The Standard Key Provider is an external Key Management Server (KMS) which is compatible with KMIP 1.1 (or higher). This is the most common key provider and was the only key provider type supported in earlier releases of vSphere. External KMS systems can be accessed by multiple vCenter Server systems which might require access to the same keys when virtual machines are replicated between two vCenter Server systems.
– Trusted Key Provider
The trusted Key Provider architecture provides an extra level of attestation in the form of a vSphere Trust Authority, a specially assigned vSphere cluster in a separate vCenter Server instance which is delegated to issue encryption keys. The vSphere Trust Authority only issues encryption keys to clusters on the condition that all hosts in the cluster pass attestation. The vSphere Trust Authority requires access to an external KMS.
– VMware vSphere Native Key Provider
Available in vSphere 7.0 Update 2 and higher, the vSphere Native Key Provider does not require access to an external KMS. You can create a single vSphere Native Key Provider that spans multiple vCenter Server systems that exist within the same vSphere Single Sign On domain.
While the Native Key Provider is the simplest way to get up and running with VMware encryption technologies, there may be use cases where you require an external KMS and you want a solution to test this functionality before you invest in the KMS system. For example, if you plan to use vSphere Replication or Site Recovery Manager to replicate encrypted virtual machines between vCenter Server systems that are not in the same vSphere SSO domain, you will require a Standard Key Provider or a Trusted Key Provider that can be accessed by both vCenter Server systems.
Note: In the case of Standard Key Providers, ensure that you configure the same Standard Key Provider name in both locations. As vSphere allows the addition of multiple Standard Key Providers, the key identifiers used in vSphere specify the Standard Key Provider name, to ensure that vCenter Server queries the correct key provider when requesting a key. The fully qualified key identifiers use the format <Key Provider Name>\<Key ID>. Therefore, when a virtual machine is replicated between sites, the target vCenter Server must have the key provider configured with the same key provider name, so it can interpret the fully qualified key identifier in the virtual machine configuration.
Deploying and Configuring PyKMIP on CentOS
To test KMIP functionality, there is a open-source project called PyKMIP, which can be used as an external KMS for use as a Standard Key Provider or to support the configuration of a Trusted Ky Provider. Please visit https://pykmip.readthedocs.io/en/latest/installation.html for full details. If you want to configure this for use with vSphere, I have compiled the following process to ensure that you can use it to fully test VMware encryption technologies.
The steps are broken down into several tasks:
- Prepare the CentOS machine
- Install PyKMIP
- Generate the server and client certificates
- Create the configuration file folder and files
- Create a systemd service to autostart the PyKMIP server
- Open the firewall port for KMIP
Preparing the CentOS machine
Download and install CentOS minimal in a VM (I used CentOS 7.6). Configure DHCP or static IP setting that allow the VM to connect to the Internet for initial configuration and download of required modules.
Prepare the OS for PyKMIP installation using the following steps:
- Perform a yum update using the following command:
yum update -y - Clean out cached package data using the command:
yum clean all - Install open-vm-tools:
yum install open-vm-tools - Install python3:
yum install python3 - Install git:
yum install git
Install PyKMIP
You use the pip3 utility to download and install the latest PyKMIP python module.
- Run the pip3 command to install the PyKMIP module:
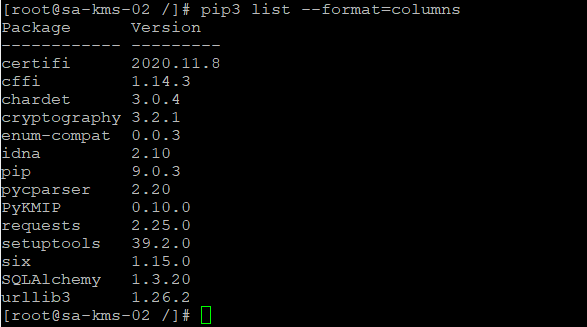
pip3 install pykmip - Check that the required modules were installed using the
pip3 list --format=columnscommand.
You should see the following modules installed:
- Change to the root directory (cd /) and clone the git repository to obtain the run scripts and sample configuration files:
git clone https://github.com/openkmip/pykmip.git

Once this step is complete, you can modify the networking to use a network that does not have access to the internet, if required.
Create the server and client certificates
Use the PyKMIP built-in tools to create server and client certificates.
- Change to the
/pykmip/binfolder, assuming/pykmipis the root folder of the cloned git repository:cd /pykmip/bin

- Run the command to generate the certificates:
python3 create_certificates.py
This command creates several certificate/key pairs, some for the KMIP server itself, and some for clients. If you want to customise the client certificates (i.e. you don’t want your vCenter Server to appear as john_doe or john_smith!!), check the section below.

Configuring custom client certificates
The built in tool for client certificate creation creates client certificates for clients named jane_doe, jane_smith, john_doe and john_smith. Wouldn’t it be great to have a client certificate specifically made for sa-vcsa-01, for example? Also, the default expiry is set at 365 days, which might cause issues for some labs if they are used for more than one year.
The python script create_certificates.py can be modified to increase the default expiry period, change the client names, and change the organization name in the server and root certs. Edit the file and change the following highlighted values:
- Modify the expiry period

- Modify the client names
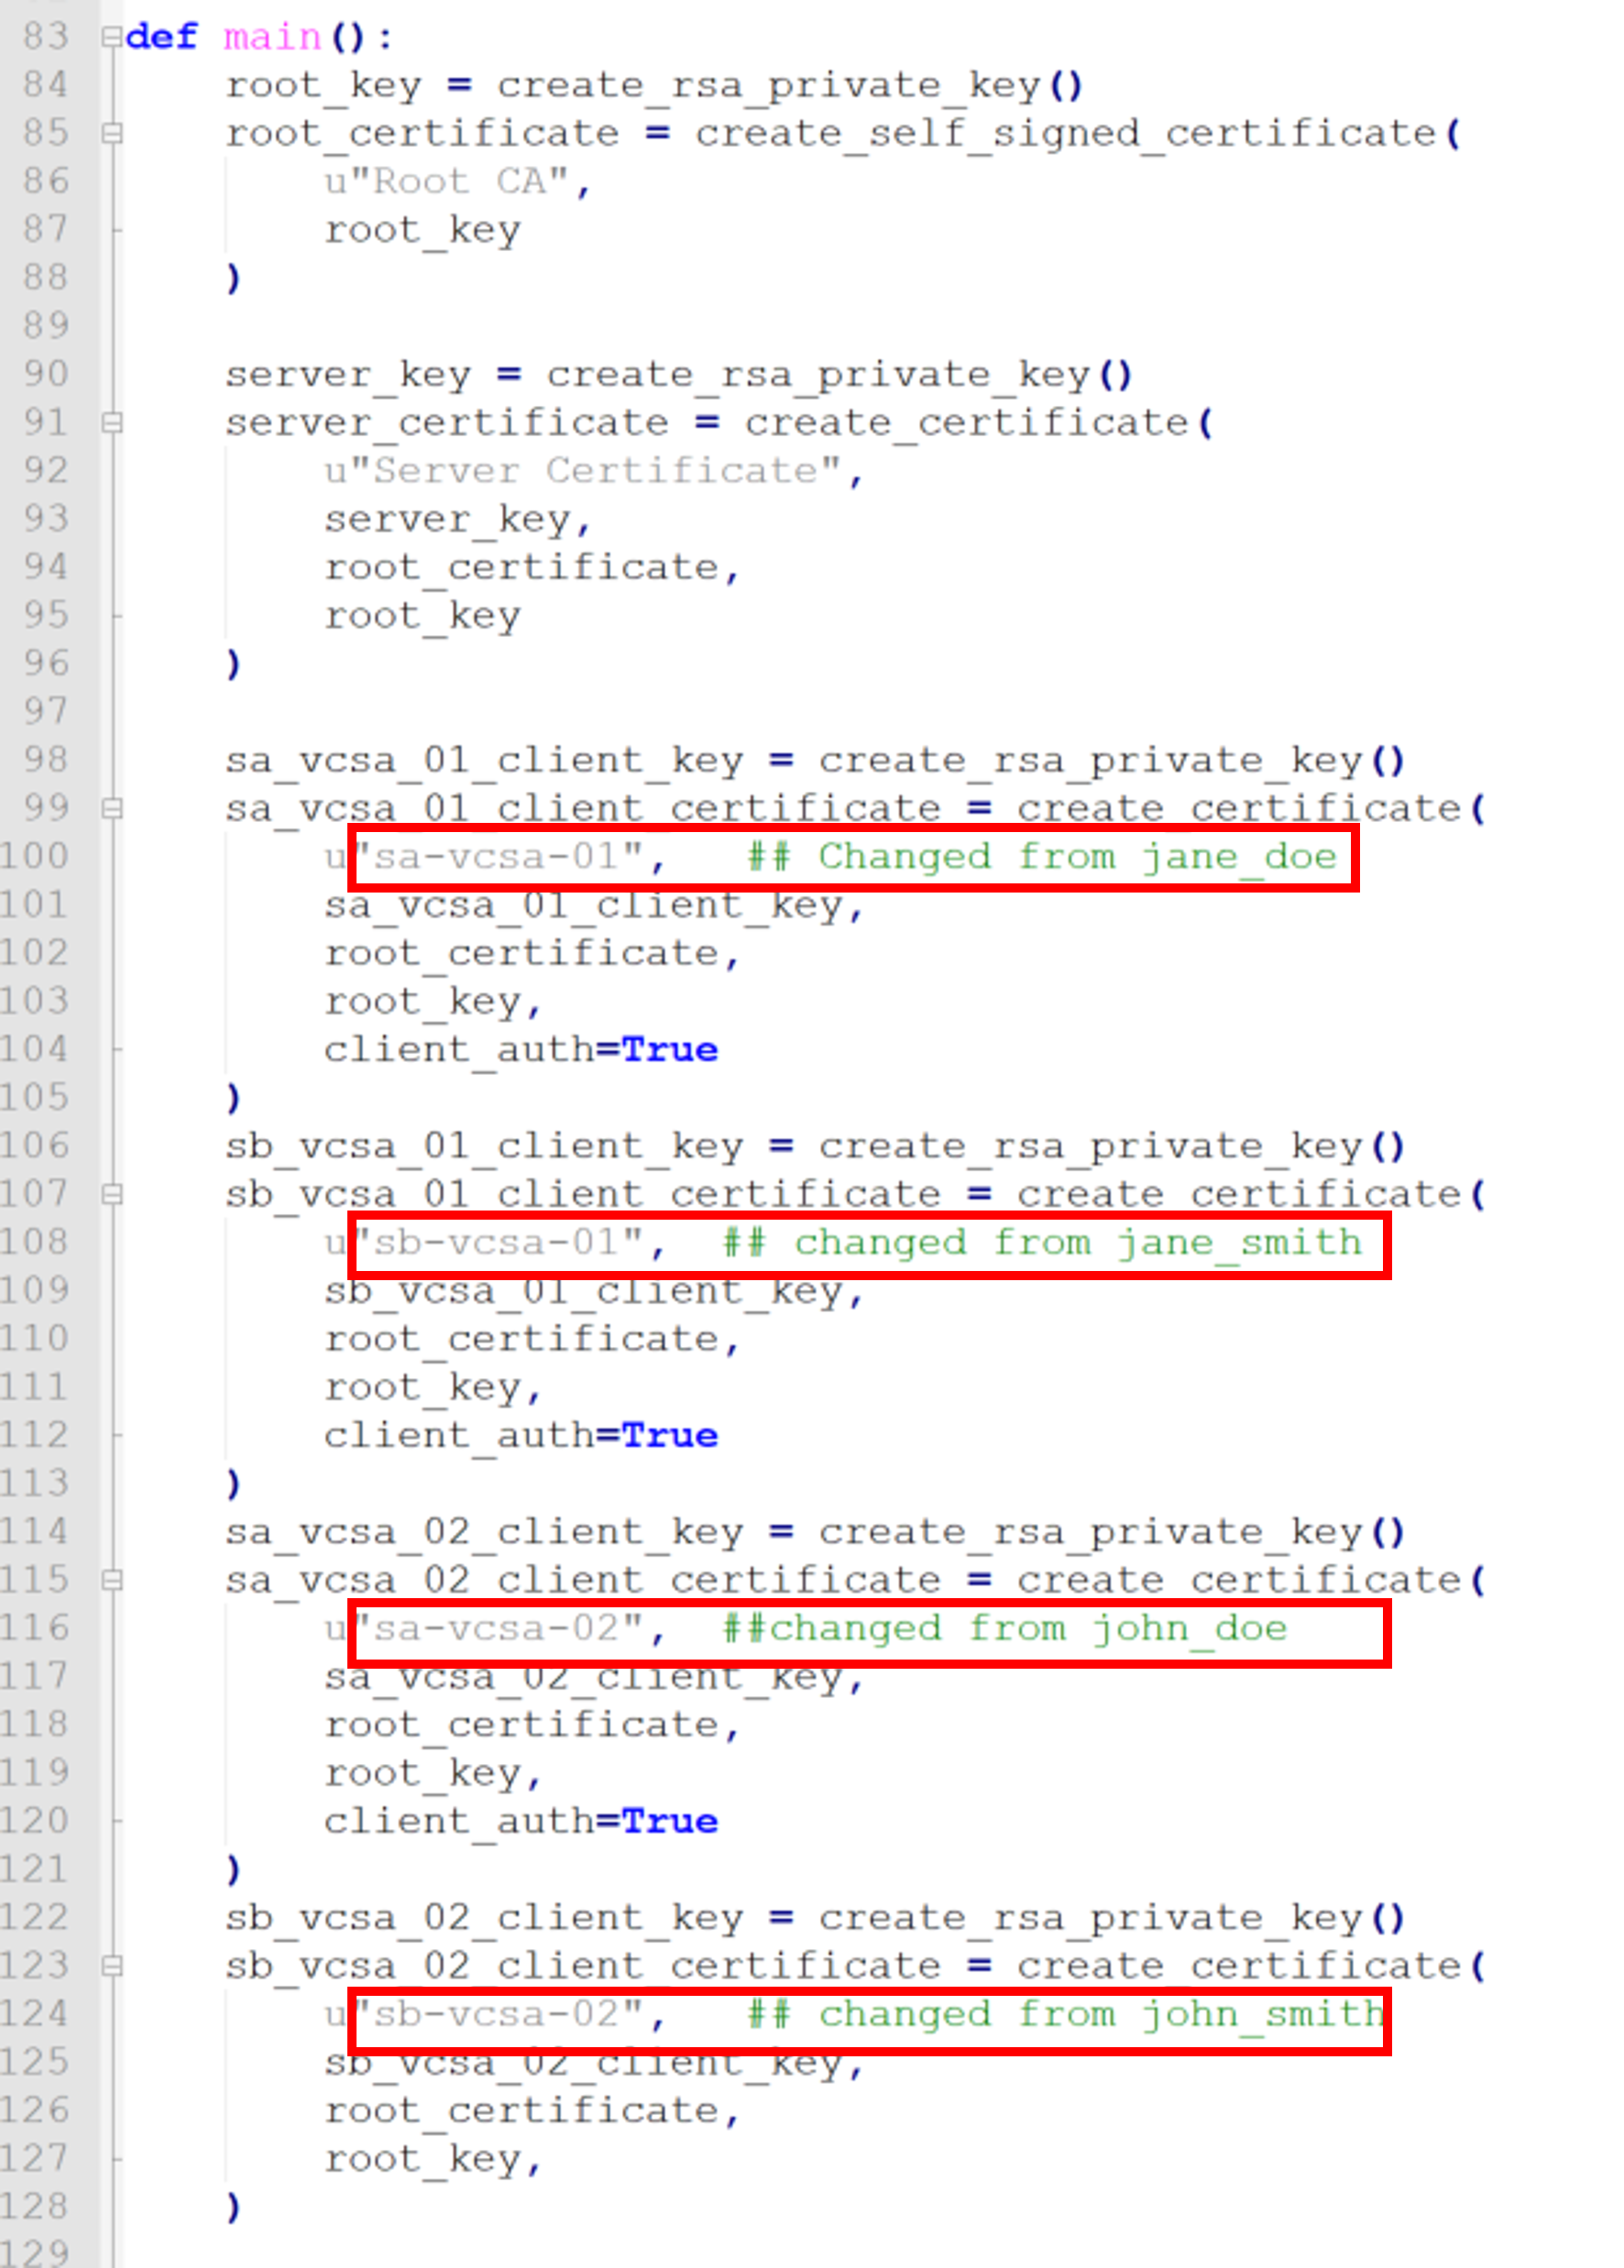
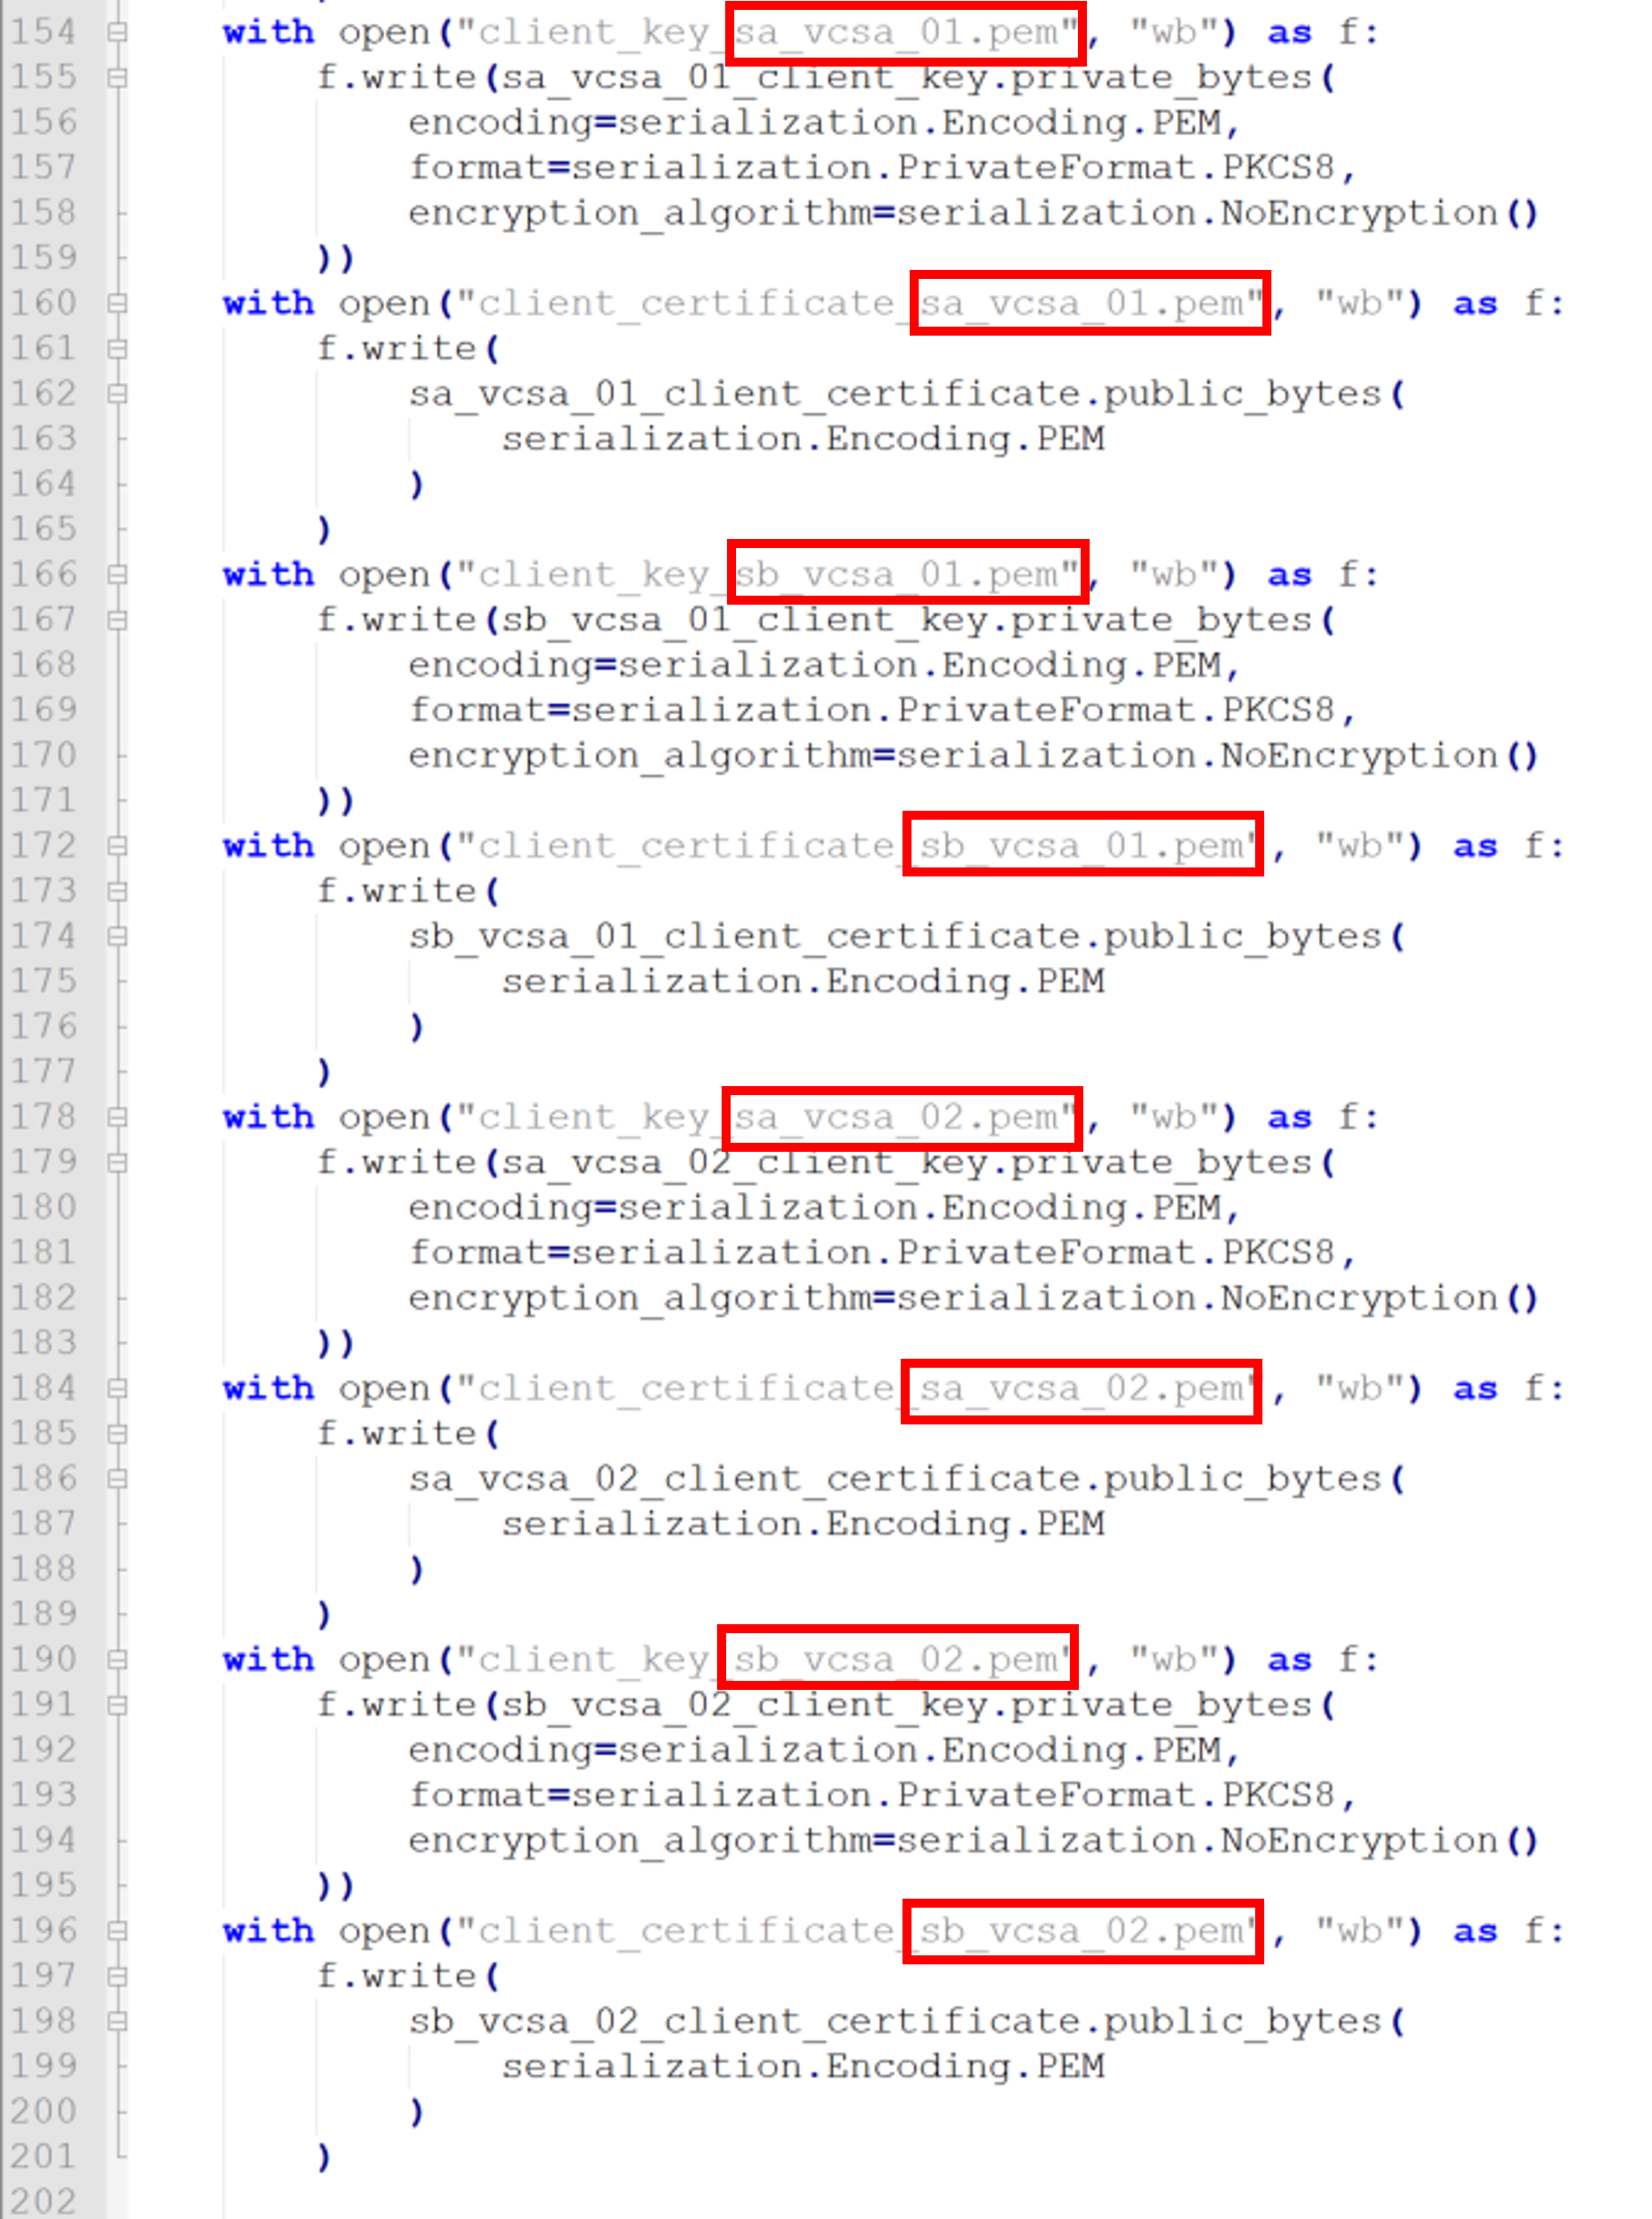
- Configure the names of the output files for the client certificate and client private key to match the client names
Create the configuration file folder and files
The server module will look for a server.conf file in the default location /etc/pykmip. Neither the folder nor the file exist and must be created manually. There is a sample server.conf file in the /pykmip/examples folder which can be used as a template.
- Create the folder /etc/pykmip:
mkdir /etc/pykmip - Create and configure the server.conf file using vi (or another text editor) as follows:
vi /etc/pykmip/server.conf[server]
hostname=<IP Address of the server>
port=5696
certificate_path=/etc/pykmip/server_certificate.pem
key_path=/etc/pykmip/server_key.pem
ca_path=/etc/pykmip/root_certificate.pem
auth_suite=TLS1.2
policy_path=/etc/pykmip
enable_tls_client_auth=True
tls_cipher_suites=
TLS_RSA_WITH_AES_128_CBC_SHA256
TLS_RSA_WITH_AES_256_CBC_SHA256
TLS_ECDHE_ECDSA_WITH_AES_256_CBC_SHA384
logging_level=DEBUG
database_path=/etc/pykmip/pykmip_server.db
This configuration file is very important as it determines how the server operates. The following values are especially important and are different from the default values in the configuration.
auth_suite=TLS1.2 – The default value for auth_suite is BASIC, which does not allow the vCenter Server to authenticate using a client certificate.
database_path=/etc/pykmip/pykmip_server.db – The default location for the SQLite3 persistent database (where all the keys and values are stored) is in the /tmp directory, which is not persistent at all! Previously, we have run into issue where the keys are lost after a reboot of the KMS, as the DB was stored in the default location. The contents of /tmp are discarded after a reboot, hence the issue. Configuring a persistent location, such as /etc/pykmip ensures any generated keys are available after a reboot of the KMS.
enable_tls_client_auth=True – This values determines whether or not the PyKMIP server requires the client to authenticate with a certificate. Setting False will allow any client to authenticate. Setting True means the client must provide a certificate signed by the known root certificate authority – i.e. the client must use one of the certs generated by the create_certificates.py command in the previous step.. You can use the certificate creation tool that is built in to create both the root cert and client certificates (as described in the previous section) that are required for vCenter Server to connect as a KMIP client. The client certificates must be signed by the root CA that is referenced in the ca_path value. - The certificate and key file paths point to the /etc/pykmip folder and use the certificates we generated in Step 3. Run the following commands to copy the required cert files into the correct directory:
cp /pykmip/bin/server_certificate.pem /etc/pykmip/server_certificate.pem
cp /pykmip/bin/root_certificate.pem /etc/pykmip/root_certificate.pem
cp /pykmip/bin/server_key.pem /etc/pykmip/server_key.pem
cp /pykmip/bin/root_key.pem /etc/pykmip/root_key.pem - Create the database file by running the command:
touch /etc/pykmip/pykmip_server.db - Copy the default policy file in to /etc/pykmip using the following command:
cp /pykmip/examples/policy.json /etc/pykmip/policy.json
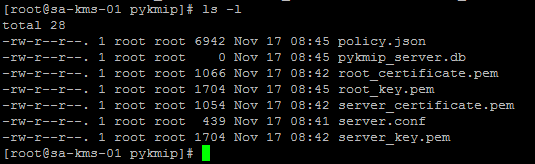
When completed, the /etc/pykmip folder should contain the following files:
Create a systemd service to autostart the PyKMIP server
Using systemd, we can create a service to orchestrate the startup of the PyKMIP server. We need to ensure that the networking stack starts first, or the PyKMIP server will fail to bind itself to the IP address defined in the server.conf file.
Create a startup script
- Create a file in the /etc/pykmip folder which is used to execute the startup command for the PyKMIP server:
vi /etc/pykmip/run_server.sh
Enter the following text#!/bin/bash
python3 /pykmip/bin/run_server.py
exit 0
and then save the file with:wq - Make the file executable:
chmod 755 /etc/pykmip/run_server.sh
Create the systemd service
- Create a file called /etc/systemd/system/pykmip.service:
vi /etc/systemd/system/pykmip.service
Enter the following text[Unit]
Description=Launches the PyKMIP service on startup
After=network-online.target
[Service]
ExecStart=/etc/pykmip/run_server.sh
[Install]
WantedBy=default.target
Save the file. - Make the file executable:
chmod 664 /etc/systemd/system/pykmip.service - Reload systemd:
systemctl daemon-reload - Enable the pykmip service so it starts up by default:
systemctl enable pykmip.service
Open the Firewall Port for KMIP
Finally, you must open port 5696 on the server to allow connections to the KMIP server running on port 5696. Of course, if you have specified a port other than 5696 in server.conf, you open the port specified in the config file.
Option 1 – disable the firewall entirely (not recommended)
Run the following commands to completely disable the firewall on the CentOS machine, thus opening all ports:systemctl disable firewalld
systemctl daemon-reload
Option 2 – Open port 5696 in the firewall
Run the following commands to open port 5696 on the firewall:firewall-cmd --zone=public --add-port=5696/tcp --permanent
firewall-cmd --reload
Add a Standard Key Provider in vCenter Server
Now you are ready to use your newly configured KMS as a Standard Key Provider in vCenter Server
- Click on the vCenter Server object in the vSphere UI and click Configure > Security > Key Providers.
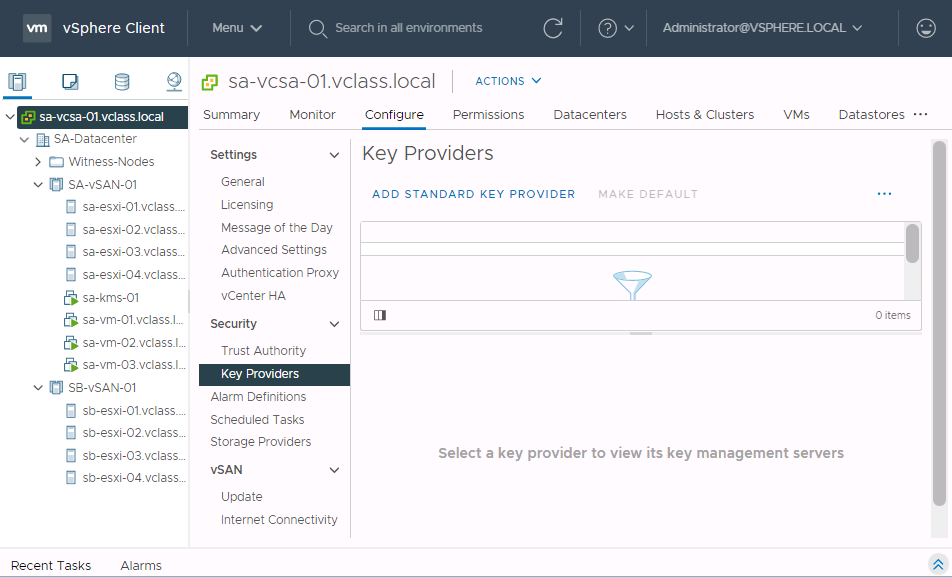
- Click ADD STANDARD KEY PROVIDER.
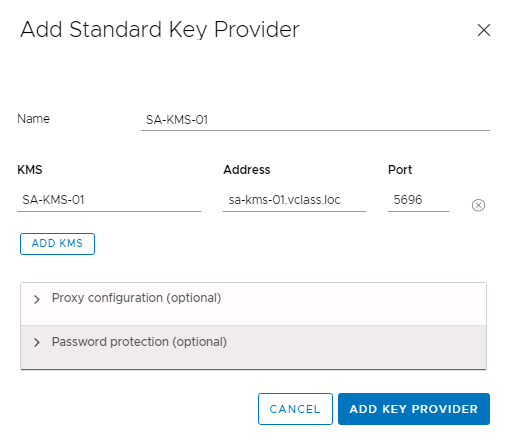
- Populate the Add Standard Key Provider wizard with the details for your PyKMIP server and click ADD KEY PROVIDER.
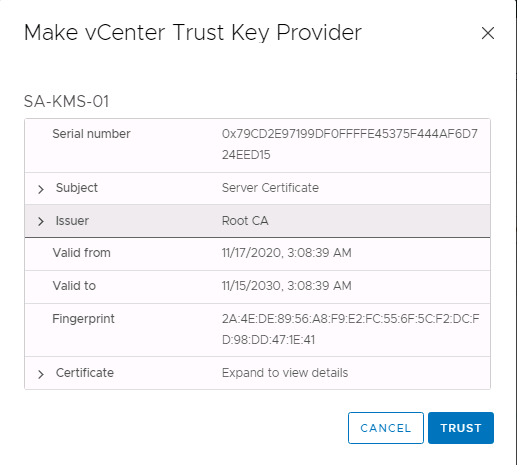
- The PyKMIP should reply with its server certificate, which vCenter must add to its trusted certificates list to allow vCenter to trust the KMS. In the Make vCenter Trust Key Provider window, click TRUST.
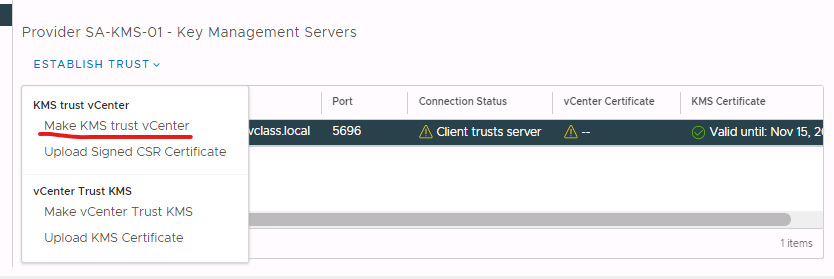
- Next, we must install the client certificate on the vCenter Server that the PyKMIP will trust. In the Key Providers panel, select the radio buttons in both the Key Provider and Key Management Servers panels called SA-KMS-01. You can see that the trust is halfway established as the Connection status shows ‘Client trusts server’.
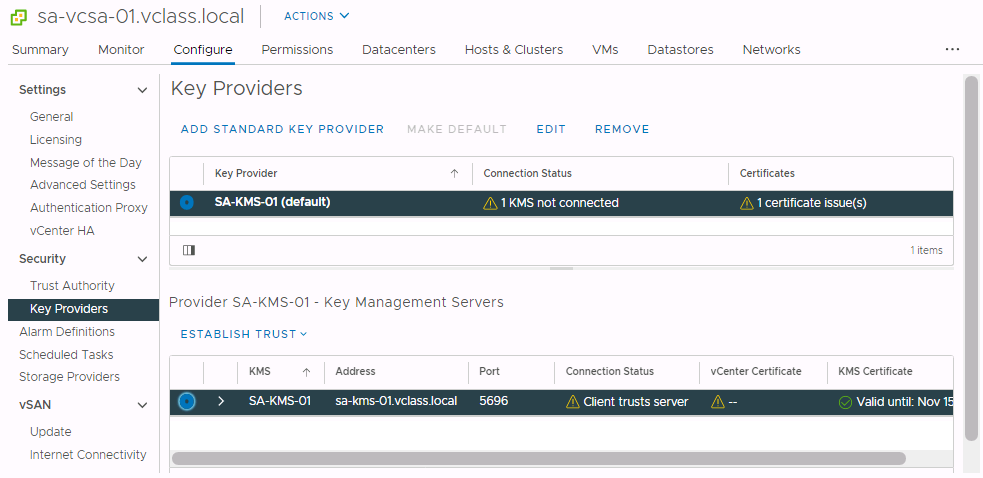
- Click ESTABLISH TRUST > Make KMS trust vCenter.
- Select the KMS certificate and private key radio button and click NEXT.
- Upload the certificate and private key you obtained from the server.
- If you downloaded the PEM files for the client certificate and private key, click the UPLOAD A FILE button and navigate to the certificate and key PEM files you downloaded.
- If you copied the text from the PEM files, you can paste it into the wizard. (Make sure you paste the text with —– BEGIN CERTIFICATE —– into the KMS Certificate text box, and the text beginning —– BEGIN PRIVATE KEY —– into the KMS Private Key text box)
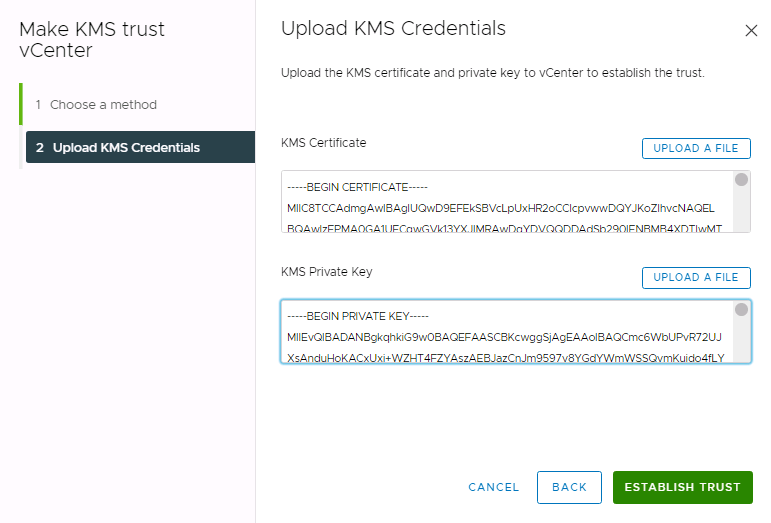
- Click ESTABLISH TRUST.
Once the trust have been properly configured, the Connection Status should show Connected.
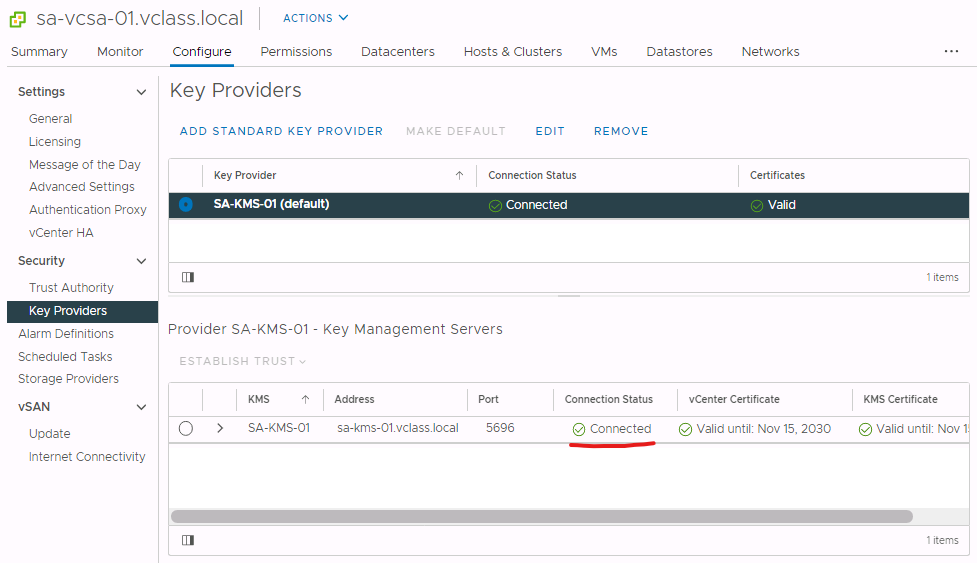
Now you are good to go and test to your heart’s content!

Leave a comment